Thursday, February 4, 2010

Random Picture


I found this picture a while ago, and I just stumbled across it while editing photos for the last post. It amuses me, since I work on both sides of cancer...causing and curing...

Setting up Shop

I've been getting interested in woodworking lately, and for Christmas this year, my parents got me a table saw. This one tool has really opened up the possibilities of woodworking projects that I can now tackle.

I started with a small project, camp chairs. I wanted some folding camp chairs that the family could take camping that were more than simple folding chairs. I found a plan for wooden camp chairs online, and I modified it by removing all the curves, making the chairs simpler. I ripped 2x4's into the appropriate sizes, and whacked out several chairs in a couple of nights. I stained the grownups' chairs a light pine, and the kids decided that they wanted bright red chairs.

Here's a couple of shots of one of the larger chairs; the chair set up, and the chair folded. It folds by sliding the seat out of the back frame, and reinserting it in between the back supports. It is actually quite comfortable to sit in. The kids' chairs are the same, but about 60% of the size.


After my last project, I added a dust collector to the table saw. Ripping several 2x4's without it filled my garage with pine wood dust. It was everywhere and on every surface. Since the laundry is in the garage, too, I need to control the dust. I tried using my shop vac, but it doesn't have the suction to handle the volume of dust a table saw creates. It does just fine with my hand tools, like a belt sander, but for a table saw, much more air flow is needed. I bought a small portable dust collector (~900 CFM suction), built a hood under my table saw out of scrap wood and a piece of 4" flashing, and I connected the dust collector with a section of flexible 4" Al dryer hose. That takes care of about 90% of the table saw dust. The rest I can deal with using the shop vac.

I'm looking forward to tackling more complex projects in the future.

Sunday, January 31, 2010

Time to Update the Blog

I've been negligent about keeping the blog up to date. Things have just diverted my attention away from this; that's a good thing, I believe. Now it's time for some new posts.

I've got a new hobby, woodworking, and it's slowly taking over my garage. For now, I'll just leave a reference to a woodworking website that I've found quite interesting; good shop tips, practical plans. Woodworking for Engineers

Sunday, April 12, 2009

Happy Birthday V! Happy Easter Everybody!

Happy Easter!

Today was Easter, and today was my daughter's birthday. We celebrated Easter at Mass this morning, and then we celebrated V's birthday this afternoon.

Virginia wanted to go to the zoo, so we were at the LA Zoo this afternoon. I was shocked at the number of people at the zoo today. We obviously weren't the only ones with this idea today. I believe the kids enjoyed it, there was bunny face-painting, and bunny ears for all the guests. The highlight was an elephant taking a shower (zookeeper with a hose). We finished the trip by stopping by the mall for dinner at the Red Robin, the birthday girl wanted to go out to eat. I've never seen an empty mall before; all the shops were closed, but a few restaurants were open. We played in the mall play area for a little bit, then ate dinner.

Since today was Easter, we went out to get Virginia's big present (from Grandparents Borths and us) yesterday. We took V to Guitar Center, and she picked out a guitar. We got her a beginner's guitar book, and we plan on lessons after she gets a little more familiar with the guitar. She now has a cherry red 3/4 size Fender. We went with an electric guitar because the strings on electrics are less difficult to press down than on acoustic guitars. That was a strong factor considering the size of V's fingers. Plus, an electric guitar is more fun than an acoustic (more knobs to play with).

(A confession from me belongs here. I will almost definitely try to learn to play V's guitar. Who knows, maybe I'll get one of my own someday...)


Easter Morning. Baskets from the Easter bunny,
and V is opening birthday presents.


Our bunny ears. If you look closely, you can see V's face paint.


Elephant shower. I believe he's drinking here.


The mall on Easter afternoon.
Deserted.


Rock on, V. Rock on.

Saturday, March 28, 2009

The kids' B-day party

We had a joint birthday party for the kids today, and I think everyone had a good time. As usual, Liz did a great job planning the shindig, and the weather today was just fabulous. We opened up the sliding glass door and let the party spill out into the back yard.

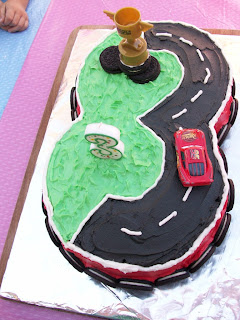
Liz set up a pizza party for the kids. She pre-baked some personal size pizza crusts, and we let the kids spread sauce, cheese and toppings on their pizzas (outside, of course). They then handed the pizzas to me in the kitchen (we have a window that opens into the backyard; it was great for this), and I baked the pizzas for everyone. The kids all got paper cook hats (think the hat you'd see at a burger joint) and paper aprons to decorate and wear. After pizza was the cake. Liz did better than last year, check out the pics below. We then opened presents, and the kids got some wonderful gifts. Then, after about 3 hours, everyone left. By then it was naptime for most of our guests under 6.


Liz made both of these cakes herself, and I was impressed. She did purchase the Care Bears, and the Car and Piston Cup on John's cake are toys, but she did everything else. Even the icing was made from scratch and dyed with her own color mix. I like the M&M rainbow (V helped with that) and the "3" road on John's cake. You can just see the oreos ringing the base of J's cake. Liz put them on because the looked like tires. V's cake is ringed with tiny marshmallows. They tasted as good as they looked.

We cleaned up this evening, and I'm enjoying some peace and quiet outside while the kids are asleep. I've got a small fire going in my new outdoor fireplace, and the wireless network lets me write this in the backyard. Today was a good day.

BTW- I'm sure Liz will be posing more party pics on her blog. I just wanted to share the cake pics first.

Sunday, March 22, 2009

My $7 outdoor fireplace

I've wanted an outdoor fireplace since I bought my house. I have a gas fireplace in the house, but burning gas inside is not the same as burning stuff (wood, charcoal, etc.) outside. I like terra cotta chimeneas, but I couldn't stomach paying over $50 for one. So I decided to make myself an outdoor fireplace.

I wanted something simple and small. I wanted to be able to move my fireplace around without trouble, and I wanted to be able to put it away when I didn't want to use it. That precluded building a permanent fire pit in the yard. (But I know how to build one out of brick now.)

I happened to see a cactus planter at Home Depot, and it struck me as the perfect fireplace. It was a shallow terra cotta dish 15" in diameter, and about 5" deep. The only downside was the presence of a drainage hole in the middle of the dish. Well, I could fix that. I bought the planter for $7, and built a nice fireplace with materials I had around my garage.

I built a stand for the pot using 2x4's. The ceramic of the pot should insulate the wood of the stand from charing or burning. I kept the stand simple; I built a 1 foot cube out of eight 10.5" lengths of 2x4 using drywall screws. I painted the stand black with a can of spray paint I had leftover from another project. To seal the hole in the bottom of the planter, I used mortar to affix a broken piece of tile over the hole. We have used the fireplace twice this weekend, roasting marshmallows both times. I hope the family enjoys it as much as I do. (Although Liz does dislike the fact that our clothes smell like smoke when we're done. C'est la vie.)

Spending only $7 on the whole project is a source of frugal pride for me. But I still would like a chimenea. Maybe I could build one...


Here's the stand I built before painting.


I put a piece of cardboard under the hole in the bottom of the pot, put a layer of mortar down, and pressed the tile into the mortar. I also had a "test fire" in the pot before doing this.


Liz and Virginia enjoyed the fire. I think the black stand looks pretty good.


John was happier running, but he did roast a few marshmallows first.

Saturday, March 14, 2009

Learning a new home improvement skill

I now know how to do basic masonry; I built a small brick wall today.

It's spring in SoCal, and it's time to start planting our garden. We have been planting a small (8' x 4') vegetable garden every year, and this year we decided to add to that. We put in a small herb garden (6' radius quarter circle) in the corner of our yard. When we installed our vegetable garden, we made a raised bed using 2x12's. It made amending the soil easier, and we were guaranteed to have good drainage.

We want good drainage for our herb garden, but we're not too worried about amending the soil. Herbs grow in just about anything. We decided to put the new plot next to our back patio, and we wanted it to look nice. Since a lot of the landscaping in our yard is brick, we decided a brick wall would make a nice border to the garden.

I have never worked with brick/masonry before, but I figured it couldn't be too hard, right? Actually, it isn't too hard; it just takes a little bit of time. I dug the garden and put in some temporary composite edging to keep the dirt in place and to mark the plot. Then I dug a small trench for the brick wall to sit in, and filled the bottom with sand. The sand provided a foundation for the wall, and allowed me to level the bricks. I had to cut a few bricks to fit, and I learned how to do that, using a brick hammer and a couple of chisels. I only ruined a few bricks learning. Applying the mortar was relatively easy after that. I only built the wall two bricks high (it's a garden border), but hey, I built a wall.

The kids helped.


I finished the project at dusk. The rectangle of pipe against the wall is my sprinkler system for the vegetable garden. We pulled it out to turn over the soil. Below the sprinkler is Dweezel, the garden gnome. He'll go home when we plant the garden tomorrow.